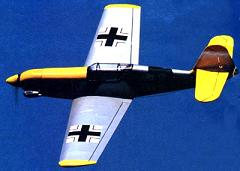
ME-109 ARF
As with most ARF kits, Model Tech's ME-109 kit is a very nice, semi-scale airplane with most of the work already finished. It flies very well and it looks good in the air. You should be able to easily assemble this kit in a weekend.
The kit is well-packaged, and all parts are wrapped separately in clear plastic bags to prevent damage during shipping. additionally, cardboard separates all the parts. The instruction manual is very well done, even though some of the photos don't look as crystal-clear as they could be.

Hardware Included:
The ME-109 ARF kit includes a Fuel tank, engine mount, wheels and landing gear, plus all the linkages.
Required Accessories:
4-channel radio, recommended .25-size engine
General accessories:
These accessories are required for all your modeling builds.
Glue
Modeling Knife
Drills
Drill bits
Screwdrivers
sandpaper
Ruler
ASSEMBLY:
The difference in humidity and temperature at the factory and your workshop, may cause some wrinkles to form in the material covering the ME-109. This is usually caused when air is trapped over the solid wooden parts of the ME-109. But you can easily remove these wrinkles using a trim iron or a small travel iron. Be sure to use the use medium heat. To make things easier, remove the wrinkles prior to starting assembly.
Follow the manual, step by step during the assembly process, because the steps are logical and well thought out.
Your first step is to join both wing halves. Be sure to trim away all coverings in the areas that require gluing.
The plywood wing joiner fits perfectly and the wing halves go together without a hitch. Place sonme rubber bands around both dowels on leading edge and aileron horns at trailing edge. This will keep pressure applied while the glue sets.
After you've done some trimming and shimmed the mount and wing bolt doubler, you can install the ailerons and the servo mount.
When mounting the tail surface on the ME-109, the only difficulty you may have is bending stabilizer braces slightly for a good fit with the fuselage sides. The elevators should go in very smoothly. The rudder and tailwheel, however, are not quite as easy. The problem being that the tailwheel mount is different from the one illustrated in the manual. The tailwheel assembly is already bent and is a little off-center. Because of this, you may have to drill a hole in the rudder to align with the mount. The manual says that the bracket should be screwed to the bottom of the fuselage, then the rudder is epoxied to the hinges and tailwheel tiller all at the same time. I recommend you epoxy the tailwheel tiller to the rudder, mount the rudder, then mount the bracket onto bottom of fuselage. This is far easier than doing it the way the manual tells you to do it.
If you do it this way, the rudder and the bracket will fit properly. After tailwheel mount is in position, shim tailwheel and solder some washers on either side to center the wheel and secure it to the axle. The finished tailwheel should now be true to the rudder and run smoothly.
landing-gear slips easily into place. The wheels are centered axles utilizing a wheel collar on both sides. The problem is that the wheels hubs are recessed, resulting in the outboard wheel collar being inside the wheel with no easy procedure to tighten setscrew! A lot of stress is put on the outboard wheel collar of the ME-109 because of the positioning of the wheels. Ensure it's secure. A good way is to just solder the outboard wheel collars to the axle.
INSTALLING ENGINE AND RADIO:
The bolts for the engine mount are just a little bit too short to secure the O.S.* .25 engine. Just use sheet metal screws. The fiberglass cowling is very nice. The instructions suggests you use a Dremel tool when trimming. Engine and cowl all fit together perfectly!
Installing the fuel tank can be a little confusing at first. The manual says the tank should be installed with the widest part across the fuselage, but the tank (being rectangle) will only fit through the forward bulkhead sideways. But after it's through the bulkhead, you won't have enough room to turn it around. The best way to do this is to get a round fuel tank! You can slip a round 4-ounce tank into the opening very easily. It also makes installation of the throttle a snap.
The aileron pushrods have poor Z-bends. You can use a Z-bend tool to make corrections, which will work very well. If you don't have the tool, try substituting threaded rods and links to connect the aileron servo to the ailerons.
The pushrods that connect the rudder and elevator, are constructed from the instructions. They weigh very little and they work really well. Radio installation is very simple and straightforward.
If you use an engine that weighs less than the one recommended in the instruction manual, you'll have to add some weight on the nose to bring the ME-109 back to the balance point. Stick-on decals go on easy. Use canopy cement and glue the exhaust stacks in position. Do a final check of the balancing and perform a radio and flight controls check prior to flight.
CONCLUSION:
The manual provides a well-explained and logical assembly sequence. The parts are done very well, as was the covering. All the parts fit together really well and there is no additional work to get them to align properly. All hardware necessary to complete the install is included. All said, the ME-109 is a really terrific flying airplane!
Top RC Hobby shops
For RC Airplanes, accessories and parts, visit our RC Hobby Shops page.
RC Plane Talk.com - Remote Control Planes, R/C Shops, Tips And More!
Be sure to Check out our main page for more Ducted Fan electric and nitro gas powered planes.
