Funtana S .40 3D ARF
Rewriting the 3D rules
An axiom in RC flying states that “bigger flies better.” With the Funtana S .40 ARF, Hangar 9 has proven that a well-built and -engineered .40-size plane can be just as stable and responsive as a much larger model.
Hangar 9 has built a reputation for high-quality ARFs, and the
Funtana is no exception. From the simple and attractive UltraCote
covering to the included fiberglass wheel pants and cowl, Hangar 9 has
yet another winner. There has been a lot of buzz on the Internet about
this aircraft and its abilities, so let’s take a closer look.
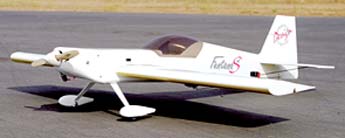
Inside the box
First, inspect the components. The box has foam inserts to prevent the parts from shifting during shipment, and inside, everything is poly-bagged. The manual is well laid out and organized and includes many helpful diagrams and pictures. The Funtana is covered in UltraCote, and the fiberglass parts are painted to match the covering. The kit includes a full set of hardware, pushrods, wheels, a fuel tank and a tinted canopy. You’ll need to supply the usual building tools and adhesives to put the Funtana together. See the Funtana in action. Go to redrockethobbies.com for more information on the Funtana S.
Building notes
• Wing assembly. As with most ARFs on the market today, assembly starts with the wing. It comes in one piece, and this greatly speeds up assembly. First epoxy the wing dowels into place, and then fit the wing in the fuselage. A single 1/4-20 nylon bolt holds the wing in place. If you reaqlly want to wring this plane out in the air, replace the nylon bolt with a stronger metal bolt for extra security. This is one area where pilots who want to perform all-out aerobatics can never be too careful. After you secure the wing, align and install the horizontal stabilizer. Before you do that, make sure that the wing is square to the fuselage. If one wingtip is farther back than the other, the plane will roll slightly to whichever wing is farthest back during hard pull-ups. To fix the problem, simply move the bolt’s blind nut 1/4 inch to the right to square the wing. To ensure that the strength of the wing-mounting block isn’t compromised, epoxy a piece of lite-ply to it.
• Tail feathers. The horizontal stab slides into a slot in the fuselage, and carbon-fiber rods that brace the tail group provide a great deal of strength, which is critical for the punishment that 3D flying subjects the model to. Install the stab, making sure that it is square and parallel with the wing. To install the carbon support rods, you are instructed to drill a hole 13/8 inches from the tip of the stabilizer and a corresponding hole in the fuselage. The rods in some kits are too short to allow them to fully seat in the holes. If this is the case, simply relocate the holes in the stab. Then glue the vertical fin into place and set the fuselage aside.
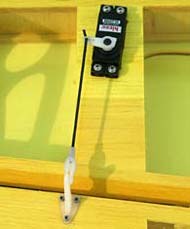
Now hinge the ailerons with the supplied CA hinges. Push a pin through the center of each of the hinges and slide them into the wing hinge slots, followed by the ailerons. There should be only a tiny gap between the wing and the leading edge of the aileron. The ailerons are truly huge and make up nearly a third of the wing. These large surfaces provide a lot of maneuverability and agility to the Funtana. When you're satisfied with their placement, wick plenty of thin CA into the hinges to secure them. When you do this, have a rag with some CA debonder handy in case you drip CA somewhere other than where it’s needed. Let the CA cure naturally (without accelerator); the bond will be stronger.
 |
 |
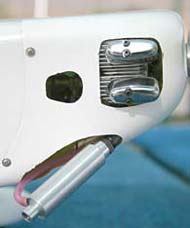
Left: the Saito FA-72 nestles nicely in the Funtana’s cowl
Right: the aileron linkage is a snap to hook up.
Lay out the parts needed to install the elevators and rudder. Before you glue anything into place, assemble the elevator halves with the joiner wire on a workbench or som,e other stationary surface. This is the perfect time to make any bends in the joiner wire so that the elevators lie flat and square. Hinge the elevators to the stab and let them cure, and install the tailwheel assembly. To make the slot for the tailwheel straight and square, use a small drill jig and then cut the slot in the rear of the fuselage. Coat the tailwheel wire with petroleum jelly to prevent it from being glued to the bearing. Hinge the rudder into place and move on to the engine installation.
• Engine installation. I suggest you use the recommended Saito FA-72 4-stroke in this airplane. It has the quick throttle response and torque to perform the 3D maneuvers the Funtana S was designed for. The Saito is an excellent match for this plane, and with the proper propeller, it provides enough power to pull vertically out of a hover and do everything you want.
The Saito nestles nicely in the engine compartment, and the supplied mount fits it perfectly. The only quirk you might encounter would be that the throttle arm is a little too close to the firewall to allow a straight shot for the pushrod and clevis. You can get around this by making the pushrod a little longer than called for and making a gentle 180-degree bend; this will allow the pushrod to be connected to the throttle arm from the front, clearing the firewall. Install the provided fuel tank without a hitch.
For those of you who are thinking about powering the Funtana with an electric motor, an entire section of the manual details its installation. With a powerful Hacker B-50 10L brushless motor geared 6.7:1 and an 8000mAh 5s4p lithium battery (four parallel 5-cell packs wired in series), this plane would be amazing and quiet.
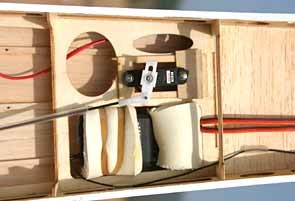 The throttle servo, the receiver and its |
• Cowl and landing gear. For the cowl to fit over the engine, youi'll have to cut a hole for the valve covers and engine head to poke through. You'll find that the easiest and most accurate way to make the opening is to tape a piece of card stock to the fuselage with the cowl off and then trace the location of anything |
that protrudes through the cowl or that you need to access (glow plug, needle valve, fuel lines, etc.) onto the card stock. Remove the engine and put the cowl in place, and transfer the outlines from the card stock onto the cowl. Use a rotary tool and cutting bits to make clean cuts in the fiberglass, and wear a good dust mask.
The landing gear is mounted on the bottom of the fuselage with two screws, and the wheels are lightweight foam. The fiberglass wheel pants look great, but you may have to add an extra mounting screw to keep them in place.
• Radio installation. Installing the radio components is straightforward and quick. The location of the elevator and rudder servos in the tail shortens the linkages, and that eliminates slop, eases setup and makes adjustments a breeze, and standard-size servos fit the servo openings without a problem.
The pushrods are the typical push-pull type, and on the elevator, If you install the pushrod in the neutral position, it would be angled downward steeply toward the control horn. With this setup, as the servo pushes the elevator in either direction, the linkage comes closer to being perpendicular to the elevator. This means that at extreme 3D travels, the pushrod actually pushes straight against the control horn (rather than up at an angle).
Flight Performance
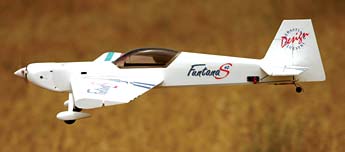
TAKEOFF AND LANDING
Takeoffs are typical for this type of airplane; they require just a bit of right rudder to keep the nose pointing straight until the tail comes up. With the Saito .72, power is not an issue, and if you accelerate quickly, the Funtana can be airborne before you have a chance to touch the rudder. Landing may actually be easier than takeoff with this plane (if that’s possible!). On the first landing, you'll feel like a spectator; once you cross the threshold of the runway and chop the throttle, the Funtana just settles right down to the ground for a very nice landing. Landing on the main wheels, 3-point landings and even tail-first landings are all easily mastered.
LOW-SPEED PERFORMANCE
Slow and low is what the Funtana is all about. The control surfaces are so large that you can maintain control of the plane even when the wing is stalled—essential for an airplane that specializes in 3D maneuvers. In a slight breeze, you can bring the plane to a virtual standstill and still be flying.
HIGH-SPEED PERFORMANCE
This model isn’t built for speed, but it will fly fairly fast. I definitely recommend that you keep the controls on low rates if you intend to fly fast, to prevent control-surface flutter.
AEROBATICS
The 3D maneuvers are where the Funtana really shines. It is easy to hover and torque roll. On the recommended high-rate elevator, waterfalls may be a bit of a struggle, but with the elevator set to its mechanical limit, waterfalls are simple and tight. Harriers are easy to enter and exit, and there is very little wing rocking with about 25 percent of flaperon mixed with the elevator. Inverted flat spins are done with elevator and rudder and just a little aileron to keep the wings level. With full deflection on the elevator and a little coaxing, a climbing inverted flat spin is possible. Knife-edge performance is good, and there is some coupling toward the belly. High-rate rolls are blindingly fast and perfectly axial. The ailerons are huge and provide control in any attitude and at any speed. Point rolls can be done with mechanical precision. Snap rolls are predictable and quick, and loops track well. The Saito FA-72 provides enough power to climb out of a hover, but I wouldn’t call it a rocket. All in all, the Funtana is a great-flying model.
|
• Final assembly and balancing. All that is left to do is to glue the canopy into place and apply the decals. The canopy is already trimmed, and it should fit perfectly; you need only glue it into place. To apply the decals, use the box art as a reference. |
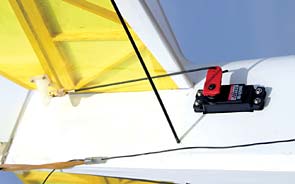 A single servo drives the elevator;the rudder |
Final thoughts
Constructing this exceptional and beautiful airplane is easy, and you'll quickly become comfortable flying it. With its thick wing and light, oversize control surfaces, the Funtana S will deliver jaw-dropping 3D performance for experienced pilots and easy stable flight for sport pilots who aspire to learn 3D maneuvers. Give one a shot; you won’t be disappointed!
If you would like to buy the Funtana S, visit Red Rocket Hobbies. They have a large number of RC electric and nitro-powered airplanes and helicopters.
By: Jet Thompson
Reprinted by permission,
Model Airplane news.
Top RC Hobby Shops, Dealers, and Online Stores
Where to buy rc planes, helicopters, parts, tools, and accessories online.
R/C Plane Talk.com - EVERYTHING You Need to Know About RC Planes, Helicopters And Jets
Click here to check out our main page for more on rc planes, helicopters and Jets.
